The house is adorned.
Saturday, December 18, 2010
Friday, August 27, 2010
Our house was featured on Apartment Therapy Chicago!
OK, so we've admittedly been houseblog slackers in the extreme.
Our friend Jenny Wray freelances for ApartmentTherapy.com
and wrote and took dozens of photos of our house.
Check it out and write nice comments for her!
http://www.apartmenttherapy.com/chicago/mary-erics-harrison-west-transformation-house-tour-125603
Our friend Jenny Wray freelances for ApartmentTherapy.com
and wrote and took dozens of photos of our house.
Check it out and write nice comments for her!
http://www.apartmenttherapy.com/chicago/mary-erics-harrison-west-transformation-house-tour-125603
Wednesday, March 3, 2010
Have bar, will travel....
We have a most magnificent vintage bar that we acquired from my stylish and fabulous friend Anne (former proprietor of No Lemmings Allowed). I'm pretty sure that her handy husband Sam made the kidney-shaped top as he used to make custom tables in the same shape. We held a joint garage sale when we were neighbors and when she didn't sell the bar she basically just let me have it. It was stashed in the basement at the old house and has spent the last year in the entry room of the new house, but our little basement project seemed tailor-made to create a new home for the bar. It fits ever so nicely in the back corner of the room. I reupholstered the chairs to go with the decor. And I have grand plans to decoupage the bar top with vintage travel images and luggage tags.
 Eric and I created the shelf in the background that houses our vintage and travel barwear. I'll find a better pic that shows that off. We even cleared out some cabinet space in the kitchen by bringing the booze bottles down and we're loving the ledge for storage.
 Eric saved the original back porch light in the renovation. He repainted the casing, rewired it with a light switch and mounted it to the rafter for more work light behind the bar. It's awesome and I love it! All of the ducts will eventually be painted with chalkboard paint so our visitors can "graffiti" the place up too:
Bar shelf and bar stools finished.
Once the shelf was assembled I stained and polyurethaned it. This photo gives a better look at the decorative trim I put on the shelf to fancy it up:
 With Eric's expertise we then put the shelf on the ledge (a near perfect fit) and stabilized it by attaching the whole thing to the beam in the ceiling in several places. Then for the fun part, filling it up with our glassware collection:
 Next up was to recover the bar stools to better match the room. Here's the gaudy art deco fabric that has been gracing them for the last half decade (my doing, I admit):
 I removed two layers of past upholstery and discovered the original vinyl covers in pretty good shape underneath it all:
 Really cool, but didn't match the decor, so I recovered them in some canvas we picked up at JoAnn Fabrics that matches the curtain a little better:
 An voila! Two barstools updated in under an hour. Next project, to refinish the bar:
Tuesday, February 16, 2010
Weekend Basement Warriors
So, inspired by some friends in Cleveland who have an uber-cool basement with a London theme and monikered "The Underground", Eric and I decided to reclaim the first room in our cavernous basement. The room was heretofore home to the furnace, dehumidifier, shelves of comic books, an armoir full of crafting supplies and a pile of project furniture that I've had every intention of decoupaging for the last 3 years (yeah, that's really only about 1/2 the stuff that was in there, but you get the picture).
First we filled in the various holes in the wall with cement and then we drylock painted the entire room - even those walls that did not really need to be sealed, as they are internal walls, but we figured it couldn't hurt. Then we picked a lovely brick red color (same as the one we used for the "wine cellar") and we painted the entire ceiling to camouflage the 100+ years of grime and discoloration - or at least make the beams not so immediately ugly:
 While we were up there we also wiped down all of the ducts and cross beams. See the makeshift beam support in the middle of this photo (look for the pole between the ladder and the ShopVac that holds a porch beam to the ceiling):
  Eric added some crossbars in a couple places that allowed us to remove the random pole in the middle of the room (apologies to those of you who wanted to practice your stripper techniques):
 Then 3 of the 4 walls received a coat of "interactive cream" paint:
 With good friends like Suz helping out one afternoon we knocked out the wall painting project in no time:
 Suz is also priceless as a photographer and captures a rare "couple" image. We're standing in the corner that we hope houses the bar one day soon:
 With the walls and ceiling painted it was time to tackle the concrete floor (after numerous vacuumings and a couple passes with a mop). We believe that once upon a time (eons ago) the front room flooded as it was covered with a very fine layer of silt which we have been sweeping and vacuuming up since the day we got here. Now we're just sealing in whatever little of it is left. First up, a coat of concrete sealer:
 And a second coat for good measure. The whole floor is left to "cure" for a week:
 And then it gets a nice coat of subtle sage floor paint:
 That has to cure for a week as well:
 We hang a curtain and rod in the "good room" to shield the view of all of the stuff we hauled out of it to undertake this project. Curtain rod from Big Lots: $10; curtain from Pier One on clearance: $17.50; not having to stare at the almost impassable adjoining room: priceless.
 A view of the curtain in action:
 The one wall on the left as you enter the room we left white just in case we ever have to re-seal it one day (God forbid). But I was allowed to paint the upper wall and ledge. Now, who can spot the very subtle change in this photo from the one three back?
 In the upper left corner you might notice a horizontal board and a cord. The ingenious Mister Martineau created a brilliant contraption to store the dartboard and shield the newly painted walls and wine cellar door:
 What you have above is a dartboard on a hinged platform that hooks up to the ceiling when not in use. Hanging from the rafter behind it (and also hidden when not in use) is a bamboo curtain that can be dropped down to protect the walls and door from displaced darts (not from Eric or I, naturally).
In the "while we are at it" category, we decided to replace the ugly vinyl tile on the steps down to the basement. First we had to pry them up:
 We found some vinyl tiles at Lowe's that look very similar to our kitchen floor (real tiles). $22 and 1/2 an hour later and we have a swanky new entrance to our future lounge. The oak trim and tin bar signs are from a previous Mister Martineau improvement project:
 And now we're onto adornments. From a fence finial found in our backyard (on the old fence when we moved in) Eric created a nifty dart holder:
 And in a quest to display some of the cool barware we own (rather than keeping it hidden in our cupboards), I set out to create a shelf that will fit into the wall behind the bar (see the "couple photo" for visual reference). I picked up all of the supplies yesterday afternoon at Lowe's in the midst of the snowstorm. Thank goodness for the help of my husband who's aid (and superior carpentry skills) made this project go twice as fast. The nearly assembled shelf has the decorative molding clamped below. It will also get molding on the shelves, then a coat of stain and poly:
Tuesday, January 12, 2010
Stairway to Heaven?
I planned on removing the second-half of our basement stairs to waterproof the foundation wall. A secondary goal was to change the stair angle so that I wouldn't hit my head when going down the stairs. You see, the staircase that was there when we bought the house was not the original (I'm guessing the original rotted due to the water). In replacing the original staircase, the angle was altered. You can see below that the final tread of the replacement stairs extended into the doorway.
 In the picture below you can see the original stair dimensions which are still visible in the concrete skimcoat. You can also see the 2nd stairway dimensions outlined in the white paint. This is the wall that had moisture penetration.
 Below is the stairway with the dirt and debris cleaned out far enough to allow me to 1. access the wall and waterproof it, and 2. install steeper risers so the stairs don't have such a long horizontal travel. Discovering the hole in the floor, I decided to patch that, too.

Below: I cut new risers after calculating the rise/run which would allow me to walk the stairs without ducking my head. This entailed measuring the total vertical and horizontal distances to be covered and trying to find a rise/run ratio that would get you low enough fast enough to avoid hitting your head but still be walkable.

Back inside: After using hydraulic cement and cement patch against the foundation wall, I dryl0ck-painted the whole area. The wood trim in the photo below is where you would hit your head when walking down the old stairs.

 In the picture below you can see the original stair dimensions which are still visible in the concrete skimcoat. You can also see the 2nd stairway dimensions outlined in the white paint. This is the wall that had moisture penetration.
 Below is the stairway with the dirt and debris cleaned out far enough to allow me to 1. access the wall and waterproof it, and 2. install steeper risers so the stairs don't have such a long horizontal travel. Discovering the hole in the floor, I decided to patch that, too.
Below: I cut new risers after calculating the rise/run which would allow me to walk the stairs without ducking my head. This entailed measuring the total vertical and horizontal distances to be covered and trying to find a rise/run ratio that would get you low enough fast enough to avoid hitting your head but still be walkable.

Back inside: After using hydraulic cement and cement patch against the foundation wall, I dryl0ck-painted the whole area. The wood trim in the photo below is where you would hit your head when walking down the old stairs.

Below is the new staircase. It is really great to be able to walk down the stairs without ducking or doing a limbo walk! They are steeper than they were, but not even so steep as dutch stairs.

And finally, a view from the top. Now the stairs end well before the doorway.


And finally, a view from the top. Now the stairs end well before the doorway.

Friday, January 8, 2010
Tales from the Underground
Still cold, so still working in the basement. We attacked the next section of wall over the past few days. Step 1, clear the wall.
 Once cleared, scrape the loose paint.
 Next - patch holes

And then paint, paint, paint.

 Once cleared, scrape the loose paint.
 Next - patch holes
And then paint, paint, paint.

Monday, January 4, 2010
15 degrees = indoor projects
January has arrived with cold temperatures and a blanket of snow.
 Despite the cold, it gladdens my heart to see bicycle tracks in the snow.

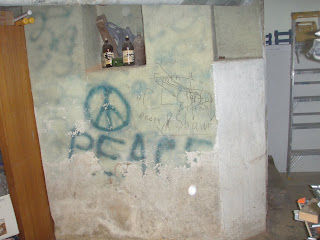
Aside from walking the dogs, outdoors is a bit too cold to enjoy. So we decided to work on our basement these first few days of 2010. Below is one of the walls in the first basement room, just as we found it 3 years ago. The bottles are relics from the crawl-space.
 We scraped off the loose paint, patched some damaged concrete and began the seal-coat.

And Viola! One white wall! We figure that the one wall is about 15% of the whole room, so we have plenty of work remaining, but it was a good start.

 Despite the cold, it gladdens my heart to see bicycle tracks in the snow.
Aside from walking the dogs, outdoors is a bit too cold to enjoy. So we decided to work on our basement these first few days of 2010. Below is one of the walls in the first basement room, just as we found it 3 years ago. The bottles are relics from the crawl-space.
 We scraped off the loose paint, patched some damaged concrete and began the seal-coat.
And Viola! One white wall! We figure that the one wall is about 15% of the whole room, so we have plenty of work remaining, but it was a good start.

Friday, December 18, 2009
Casings & Cornice
A few weeks ago I wrote about stripping and refinishing some painted door casings. I posted a photo of the white-painted casings next to our laundry closet door. Below is the door after I removed the casings.
 At the same time, I removed the painted casings to the door into the second floor den/guestroom.
 After stripping the paint and sanding out the remaining paint, I stained and poly'd them. Pictured below is the finished product.

I also made significant ground on the other project, the tin-ceiling cornice installation.

 I'm not done yet, as I am 2 pieces shy of having enough to finish. It turns out when measuring I probably used the actual wall/cabinet measurements and didn't account for the 5.25 inches of overhang on any exterior corner, and also I had to line up the seams in the cornice pieces with the seams on the ceiling, which resulted in me needing to cut-off somewhere between 1 and 6 inches on every corner. It was a challenge nailing into the hardwood cabinets, even after drilling pilot holes, but I didn't end up destroying any pieces so I am fortunate. I think I will take a break and just enjoy it over the Holidays!
 At the same time, I removed the painted casings to the door into the second floor den/guestroom.
 After stripping the paint and sanding out the remaining paint, I stained and poly'd them. Pictured below is the finished product.
I also made significant ground on the other project, the tin-ceiling cornice installation.

 I'm not done yet, as I am 2 pieces shy of having enough to finish. It turns out when measuring I probably used the actual wall/cabinet measurements and didn't account for the 5.25 inches of overhang on any exterior corner, and also I had to line up the seams in the cornice pieces with the seams on the ceiling, which resulted in me needing to cut-off somewhere between 1 and 6 inches on every corner. It was a challenge nailing into the hardwood cabinets, even after drilling pilot holes, but I didn't end up destroying any pieces so I am fortunate. I think I will take a break and just enjoy it over the Holidays!
 Monday, December 14, 2009
Tackling the tin ceiling crown molding
Below is our kitchen ceiling. We installed the tin ceiling, lets say, 2 years ago, before the rest of the kitchen was installed. After the flooring, cabinets, counters, paint and trim were installed, we still had to install the crown molding. This, quite frankly, scared the heck outta me, since 1. I've neve installed molding and have no experience with mitering/coping, and 2. the molding is thin-thin-thin metal, meaning it the pieces don't join in a tight seam, it could look pretty poor. Oh and 3. Since it has to mate with the tin ceiling, if I don't get it flush you will see a gap and it will look crappy. So, for the last 16 months I have put it off. But a sudden burst of courage and I decided to take it on.
 We purchased the cornice pieces at the same time we bought the ceiling pieces and thankfully did not destroy them during the past 2+ years. Armed with all the installation instructions I could find on the internet and a power-miter saw borrowed from old friends, I was equiped to do the job. Now, to see if I could actually do it.
And below you have section #1. Honestly can't believe how well it is coming out. Not claiming it's perfect, but over-all, quite happy with it so far.

Subscribe to:
Posts (Atom)